
INTRODUCTION
Has your refrigerator been looking dull and boring for years? You are not alone. Most Indian homes have the same plain white or grey refrigerator sitting in the kitchen — completely ignored as a design opportunity. But here is the truth: your fridge is one of the largest visible surfaces in your kitchen, and transforming it takes less than 30 minutes with the right fridge wallpaper.
In this complete guide we will walk you through everything you need to know about how to apply fridge wallpaper in India — from choosing the right fridge sticker and measuring your refrigerator, to applying it perfectly without bubbles or wrinkles, and maintaining it for years. Whether you are a first-timer or have tried fridge stickering before, this guide will ensure you get a professional, salon-quality result every single time.
By the end of this guide you will know:
• What tools and materials you need before starting
• How to measure your fridge correctly for a perfect fit
• Step by step application process for bubble-free results
• How to handle corners, edges, and handles
• How to maintain your fridge wallpaper for 3-5 years
• Common mistakes to avoid
What is Fridge Wallpaper and Why is it So Popular in India?

Fridge wallpaper — also called fridge stickers, refrigerator stickers, or fridge decal wrap — is a self-adhesive vinyl wrap designed to cover the exterior surface of your refrigerator. It comes in hundreds of designs, is printed with high-definition UV-resistant inks, and transforms the appearance of your fridge completely — without any permanent changes, tools, or professional installation.
The popularity of fridge wallpaper in India has exploded in recent years, and for very good reasons:
• Affordable kitchen makeover — costs ₹100 per square foot vs ₹50,000+ for a new refrigerator
• No renovation required — peel, stick, and done in 30 minutes
• Completely removable — no damage to your fridge surface
• Huge variety of designs — from marble and floral to 3D and nature-inspired
• Perfect for renters — change your kitchen look without landlord permission
• Hides scratches and dents on older fridges — makes them look brand new
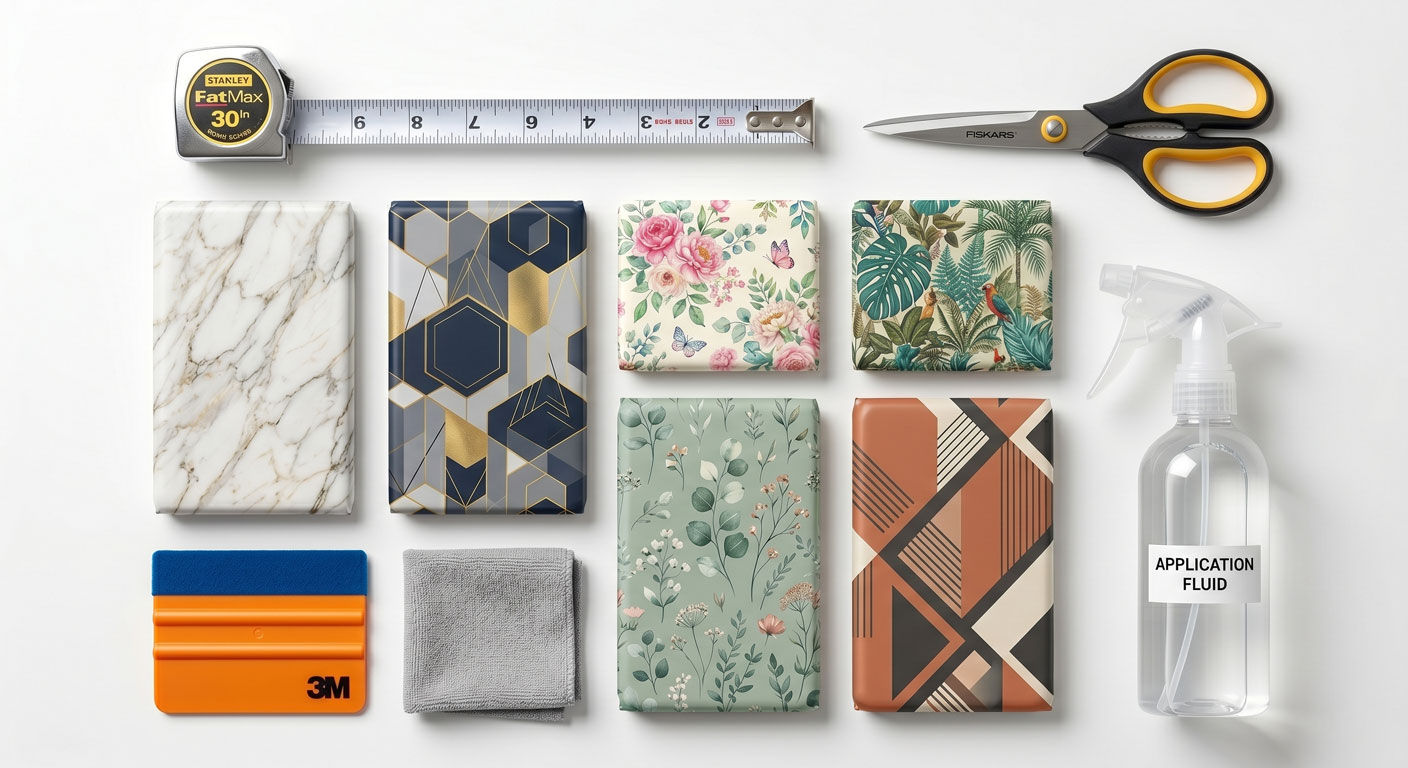
What You Need Before You Start — Tools and Materials Checklist

Before you begin applying your fridge wallpaper sticker, gather everything you need. Having all your tools ready before you start makes the entire process smoother and faster.
Essential tools (you probably already have these at home):
• Measuring tape — to measure your fridge door dimensions
• Clean dry cloth or microfibre cloth — to clean the fridge surface
• Scissors or a craft knife — to trim excess vinyl
• Credit card, debit card, or squeegee — to smooth out bubbles
• A pin or needle — to pop any remaining small bubbles
• A helper (optional but very useful for large double door fridges)
Optional but helpful:
• Mild soap and water solution in a spray bottle — helps with repositioning during application
• Ruler or straight edge — for cleaner edge trimming
• Hair dryer — helps the vinyl conform around curved edges and handles
✅ PRO TIP: If you do not have a squeegee, a credit card wrapped in a soft cloth works perfectly and will not scratch the vinyl surface.
SECTION 3
How to Measure Your Fridge for Fridge Wallpaper — Getting the Size Right
Getting the measurement right is the most important step. An incorrectly sized fridge sticker will not cover your fridge properly and may leave gaps or require awkward trimming. Follow these steps carefully:
Step 1 — Measure the height of your fridge door
Use your measuring tape to measure the full height of the fridge door from the very top edge to the very bottom edge. Write this measurement down in centimetres. If you have a double door fridge, measure each door separately as they may be different heights.
Step 2 — Measure the width of your fridge door
Measure the full width of the fridge door from the left edge to the right edge. For double door fridges, measure each door panel separately. Note that some double door fridges have a slightly larger left panel or right panel.
Step 3 — Add 2-3 cm to each dimension
Always add 2-3 cm to both your height and width measurements. This gives you extra material to work with during application and ensures full coverage to the edges. You can trim the excess after applying.
Step 4 — Note your fridge brand and model
When ordering from Canvas Groove, include your fridge brand (Samsung, LG, Whirlpool, Haier, Godrej etc.) and model if possible. This helps our team provide the most accurate size recommendation and cut your fridge sticker wallpaper to the best dimensions for your specific refrigerator.
✅ PRO TIP: For single door fridge stickers the average Indian fridge door is approximately 55cm wide x 120cm tall. For double door fridge wallpaper each panel is typically 40-45cm wide x 165-175cm tall. But always measure your specific fridge as sizes vary significantly between models.
Preparing Your Fridge Surface — The Step Most People Skip
image
Surface preparation is the single most important factor in getting a long-lasting, bubble-free result. Most people skip or rush this step — and then wonder why their fridge sticker peels or bubbles within weeks. Do not make this mistake.
How to prepare your fridge surface correctly:
1. Remove everything from the top of the fridge and clear the area around it — you need space to work.
2. Clean the fridge door thoroughly with a damp cloth to remove dust, fingerprints, and grease. Pay extra attention to the edges and corners.
3. Mix a small amount of mild dish soap with water and wipe the surface down. This removes any remaining grease or cooking oil residue — common in Indian kitchens.
4. Wipe the surface dry completely with a clean dry cloth. The surface must be completely dry before applying the vinyl sticker.
5. Wait 10-15 minutes for the surface to fully air dry before starting application. Applying to a slightly damp surface is one of the most common causes of fridge sticker failure.
⚠️ AVOID: Never apply fridge wallpaper to a surface with any moisture, grease, or dust. Even a thin film of cooking oil will prevent the adhesive from bonding properly and cause peeling within weeks.
✅ PRO TIP: In Indian kitchens with heavy cooking, use a degreaser or rubbing alcohol on a cloth for the final wipe-down. This ensures a perfectly clean, grease-free surface for maximum adhesion.
How to Apply Fridge Wallpaper — Step by Step Application Process
image
Now the main event. Follow these steps carefully and you will achieve a bubble-free, professional-quality fridge sticker application that looks like it was done by a professional.
Step 1 — Unroll and orient your fridge sticker
Unroll your Canvas Groove fridge wallpaper sticker carefully and lay it flat on a clean surface — design side down. Let it rest flat for 5-10 minutes if it has been rolled tightly. This allows the vinyl to relax and lie flat, making application much easier.
✅ PRO TIP: If your fridge wallpaper arrived tightly rolled, use a hair dryer on the lowest heat setting for 30-60 seconds to gently warm the vinyl. This makes it more pliable and easier to apply smoothly.
image
Step 2 — Do a dry run first
Before peeling anything, hold the fridge wallpaper sticker up against your fridge door to check the sizing and orientation. Make sure the design is the right way up and that it covers the door fully. This is your last chance to check before committing to the application.
Step 3 — Peel the backing from the top — only 5-10 cm at first
Do not peel the entire backing off at once. This is the most common mistake beginners make. Start by peeling only 5-10 cm of the protective backing from the top edge of the sticker. Fold the backing back carefully so it does not stick to the adhesive side.
⚠️ AVOID: Never peel the entire backing off before applying. The fully exposed adhesive will stick to itself and create permanent creases that are impossible to remove.
Step 4 — Align the top edge carefully
Hold the fridge wallpaper sticker by the top corners with the adhesive side facing the fridge. Align the top edge of the sticker with the top edge of your fridge door. Make sure it is straight and centred before pressing it down. Take your time with this step — the alignment you set here determines everything that follows.
✅ PRO TIP: Step back and look at the alignment from a distance before pressing down. It is much easier to adjust before any adhesive contacts the fridge surface.
Step 5 — Press the top edge down and smooth outward
Once you are happy with the alignment, gently press the exposed top strip of the sticker onto the fridge door. Use your credit card or squeegee to smooth from the centre outward toward both edges — never from one side to the other, always from centre outward. This pushes air out to the sides rather than trapping it.
Step 6 — Continue peeling and applying in sections
Pull another 10-15 cm of backing off and continue applying downward, smoothing each section firmly with your squeegee before revealing the next section of backing. Work methodically from top to bottom, always smoothing from centre outward in each section.
This controlled, section-by-section method is the key to a bubble-free, wrinkle-free fridge sticker application. It gives you complete control at every point and allows you to spot and fix any misalignment before it becomes a problem lower down.
Step 7 — Handle the fridge handle area
When you reach the fridge handle, work slowly. You have two options:
• Option A — Apply over the handle area and cut around the handle with a craft knife after the sticker is fully applied. This gives the cleanest result.
• Option B — Cut a slot for the handle in the sticker before applying. Mark the handle position on the sticker backing, cut carefully, then apply. This is more difficult but avoids cutting on the fridge itself.
✅ PRO TIP: For the cleanest handle finish, use Option A. Apply the full sticker, press it firmly around the handle base, then use a sharp craft knife to cut carefully around the handle. Run your fingernail along the cut edge to seal it firmly.
Step 8 — Smooth the entire surface one final time
Once the full sticker is applied, go over the entire surface one more time with your squeegee from top to bottom, pressing firmly to ensure complete adhesion. Pay extra attention to the edges and corners — press these down firmly with your fingernail or the edge of the squeegee.
Step 9 — Deal with any remaining bubbles
Small bubbles that appear after full application can be fixed easily. Use a clean pin or needle to make a tiny hole in the centre of the bubble. Press the air out gently toward the pinhole with your fingertip. The hole will be invisible from normal viewing distance and the bubble will be completely gone.
⚠️ AVOID: Do not try to lift and reapply sections of the fridge sticker to remove bubbles. This stretches the vinyl and creates permanent wrinkles. Always use the pin method for bubbles after full application.
Step 10 — Trim any excess vinyl
If your fridge sticker extends beyond the edges of the fridge door, use sharp scissors or a craft knife with a straight edge to trim the excess. Cut slowly and cleanly, following the edge of the door. Run your fingernail along the cut edge afterward to seal it completely.
Applying Fridge Wallpaper on Double Door and Side-by-Side Fridges
Double door and side-by-side fridges require a slightly different approach. Here is how to handle them:
For double door fridges with a continuous design:
1. Apply the larger door panel first (usually the right door on Indian double door fridges).
2. Follow the same top-to-bottom, section-by-section method.
3. When applying the second door panel, open the first door slightly to check that the pattern aligns correctly across the gap.
4. The gap between the two doors when closed is typically 2-3 mm — account for this when aligning your pattern.
For side-by-side fridges:
Side-by-side refrigerators have two tall, narrow panels. Apply each panel independently using the same method. Canvas Groove provides side-by-side fridge wallpaper as two separate panels with alignment guides printed on the backing — follow these guides for perfect pattern matching across both doors.
How to Maintain Your Fridge Wallpaper — Making it Last 3-5 Years
With proper maintenance your Canvas Groove fridge wallpaper sticker will look as vivid and fresh after 5 years as it does on day one. Here is how to care for it:
Daily and weekly maintenance:
• Wipe the fridge sticker surface with a damp cloth to remove fingerprints, food splashes, and cooking residue
• Use a mild soap and water solution for stubborn stains — it will not damage the vinyl or the print
• Dry the surface immediately after wiping — do not allow water to pool at the edges
What to avoid:
• Never use abrasive scrubbers or steel wool — these will scratch the vinyl surface
• Avoid harsh chemical cleaners like bleach, acetone, or strong detergents
• Do not use sharp objects near the edges — they can lift the vinyl
• Keep the fridge away from direct sunlight if possible — prolonged UV exposure can fade even UV-resistant inks over many years
✅ PRO TIP: Canvas Groove fridge wallpapers are made with UV-resistant, waterproof, and oil-proof PVC vinyl. Regular kitchen cleaning products are safe to use on the surface without any risk of damage to the print or adhesive.
How to Remove Fridge Wallpaper Without Damaging Your Fridge
One of the biggest advantages of Canvas Groove fridge wallpaper is that it is completely removable without leaving any adhesive residue or damaging your refrigerator surface. Here is how to remove it cleanly:
1. Start at one corner — usually the top corner works best. Use your fingernail or the edge of a credit card to gently lift the corner of the vinyl.
2. Once you have a grip on the corner, pull slowly and steadily at a 45-degree angle back toward the fridge — not straight out at 90 degrees. Pulling at 45 degrees reduces the chance of tearing and ensures the adhesive comes off cleanly.
3. If the vinyl feels resistant, use a hair dryer on low heat to gently warm the adhesive — this softens it and makes removal much easier.
4. Continue peeling slowly and steadily across the entire door. Never pull quickly — slow, steady pulling gives the cleanest removal.
5. If any small adhesive residue remains after removal, rub it gently with a soft cloth dampened with rubbing alcohol. It will come off completely.
✅ PRO TIP: The best time to remove fridge wallpaper is on a warm day. The slightly higher temperature softens the adhesive and makes the vinyl more pliable — resulting in a cleaner, easier removal.
FAQS
Still have questions?
Contact Support